Preparing Your Room For Audio Recordings
Posted on 31 March 2022
Let’s start with something very important: good audio is critical if you want to produce high quality screencasts.
It’s actually more important than the quality of your camera.
While folks watching your screencasts can tolerate an average video quality, they will likely bail out very quickly if your audio is below a certain perceived threshold.
So here’s my suggestion: before you think of getting all fancy with a DSLR camera and expensive lights, make sure you optimise your setup for good audio recordings.
What makes or break a good recording?
Good audio starts with ideal recording conditions. Just like a great meal starts with fresh ingredients.
You can always “save” a meal by adding some salt and other flavours - just like you can “fix” audio with a noise gate, clever EQ or audio repair plugins.
But there’s no way around this: nothing will beat a clean raw recording, in optimal conditions.
The right choice of microphone will of course have a big impact on your results, but before we consider audio recording equipment, let’s take a step back.
Let’s talk about the things you may consider doing, regardless of what microphone you’re going to use.
Let’s prepare your room for optimal recordings.
Sound proofing or sound absorbing?
I want to clarify something that often creates confusion. The concepts of soundproofing and sound absorbing are two vastly different things.
Soundproofing a room refers to blocking the outside noise from coming in. Barking dogs, cars driving by. Birbs chirping.
Or, you know, the daily leafblower routine from your dear neighbour 😅
On the other hand, sound absorbing is all about improving the sound quality inside the room. As in, removing the dreaded room “reverb”, by…absorbing it.
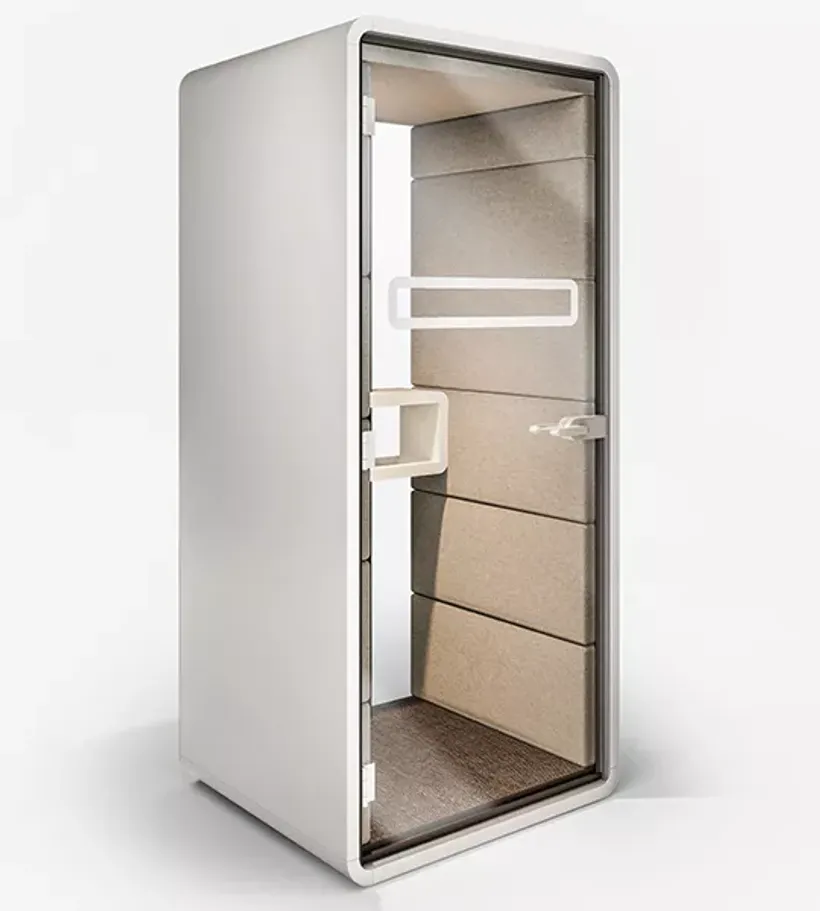
If you were hoping for an easy way to soundproof your space and block the outside noise, I have bad news for you: it’s extremely expensive and complicated to do so properly.
If that’s what you want, you’d be better off buying one of these office “phone booth” pods – and they’re not cheap.
Instead, what we’re going to focus on in this post is how to deal with the internal sound of your room.
Let’s tackle that nasty room reverberation.
While reverb is a sometimes desired effect for singers or acoustic instrument players, for spoken words and voiceovers you typically want the driest, cleanest possible vocals.
With ideally zero reverb - but good luck with that!
What causes room reverb?
To be able to damper the reverb in your room, it’s important to understand what causes it in the first place.
Sound is slow
One characteristic of sound is that it travels at a fairly slow speed. Approximately 330m/second.
That’s slow enough for you to witness a noticeable delay when sound has to travel a bit.
I remember as a kid always counting the seconds between a lightning strike and the sound of thunder, and estimate how far away the lightning had hit.
Sound is bouncy
Another characteristic of sound is that it bounces off things and keeps travelling.
Another thing I loved doing as a kid growing up near mountains was to yell something very loud, and have the mountain yell it right back at me.
In the case of a distant mountain, we’ve got one single, clean bounce, returning us a delayed, one-off sound of our own voice: an echo.
You’re yelling inside a small, bouncy box
Instead of yelling at a distant mountain, when recording a screencast, you’ll be talking in a small box.
And if your voice can reach a distant mountain, trust that it can frantically pinball off the 6 faces of your small box. Many, many times.
Kinda like playing squash with a magic bouncy ball, if you can picture that in your head.
Instead of a single-trip, long distance travel (distant mountain) echo, we get a frenzy of super short-distance trips, again and again and again. Every single round-trip creates a very short extra travel time delay.
And that’s reverb.
Reverb is in fact a very rapid echo, repeated over and over, until it eventually dies off.
Because yes, it eventually goes away.
And the whole trick to dampering reverb is to create an environment that makes it go away quicker.
Remove the things that breed reverb
To run wild inside your room, reverb needs two environmental conditions:
- Hard, flat surfaces: just like a magic bouncy ball, sound waves will bounce much better off a hard and flat surface than off something soft and thick.
- Straight angles: sound will bounce off a surface just like, once again, a ball would. If it hits a perpendicular wall, it will bounce right back where it came from.
I have more bad news for you: the vast majority of rooms we use as an office/studio are essentially boxes made of 6 hard, flat surface sides with straight angles.
Oh no 🙀
You’re literally starting off with the worst case scenario. A reverb factory, essentially.
The good news? You can basically only improve things from there!
Do what you can to cut off direct lines of “infinite bounce loop”
Now that you know what creates reverb, you probably understand how to fight reverb.
And like I said, almost anything you do will improve the situation.
Even just adding a desk and a chair in an empty room will already make the situation much better.
Sorry for y’all minimalists out there, but the more crap you add to the room, the better the reverb situation will get.
You can still achieve an instagram/unsplash-worthy desk and background feature wall.
The secret is to hide all the crap just outside of the camera frame 😅
Set your benchmark before you start
Here’s one thing that I like doing, as it really helps appreciate your room audio improvements.
I like to do a “clap” or “snap” test in the room, before making any improvement.
Record yourself claping your hands, snapping your fingers, knocking on desk. Walking in high heels around the office, anything that will produce a sharp, distinct sound.
Here’s a fantastic example of an empty room reverb from my good friend Mike, producing a Sharp sound:
I should have installed some in my kitchen 😜 pic.twitter.com/vlBLMCcCUf
— Mike Sharp (@msharp) June 10, 2021
Impressive! Almost sounds like there is a mountain inside the kitchen. And it sends back a solid echo.
Keep this test as your starting point benchmark, and do this exact same test again as you start making improvements to your space.
You’ll learn in no time what works and what doesn’t. What’s a waste of money, and what’s a legit life hack.
Start with low hanging fruit interventions
You need a quick win to boost your motivation, and realise that it’s worth spending some time making those improvements.
Remember – the 6 faces of your room (4 walls, 1 floor and 1 ceiling) are all contributing to this reverb mess. Treating each of those has the potential to dramatically improve your situation.
Start with one of them, whichever is the easiest for you.
In 99% of cases, this will be your floor.
Covering a hard floor with fluff - a game changer by itself
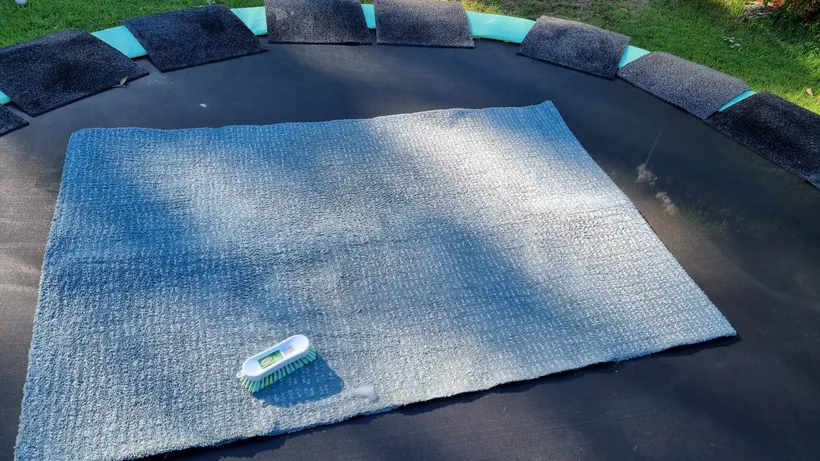
If you have hardwood/concrete/hard vinyl floors in your space, your #1 move should be to cover that with some fluffy fabric.
You don’t have to break the bank or get a carpet fitted professionally. I personally bought 10x 40cm/40cm “office carpet tiles” from Bunnings (the Australian equivalent of Home Depot). They covered about half of my floor area.
To fill the remaining space, I also purchased a cheap rug from Ikea. Mostly for looks, but also because it was mad fluffy.
An added benefits of these carpet tiles and small rug: if your house gets flooded like mine did a couple of weeks ago, it’s fairly easy to wash them and dry them in the sun:
Here’s a golden rule of combatting reverb: the thicker/softer/fluffier something is, the most impactful it will be.
All right, you’ve covered up your hard floors? Now go and do the same clap/snap test again.
Holy crap, right?
I promise you: even if you don’t do anything else to treat your room, covering the floor with some type of fabric will by itself make a significant change, for the better.
And by covering the floor, you’ve also greatly reduced the negative impact of your ceiling. You’ve broken the top/bottom direct line of infinite bounce loop.
Next up, the wall behind your microphone
The next most important space to treat is the wall directly behind your microphone.
It’s the wall you’re “speaking into”, and therefore the first significant point of impact in terms of soundwaves bouncing around.
From there, the stuff goes everywhere, including right back into the microphone. It’s a mess.
So if you’re able to absorb most of that first impact, you’ll be in really good shape.
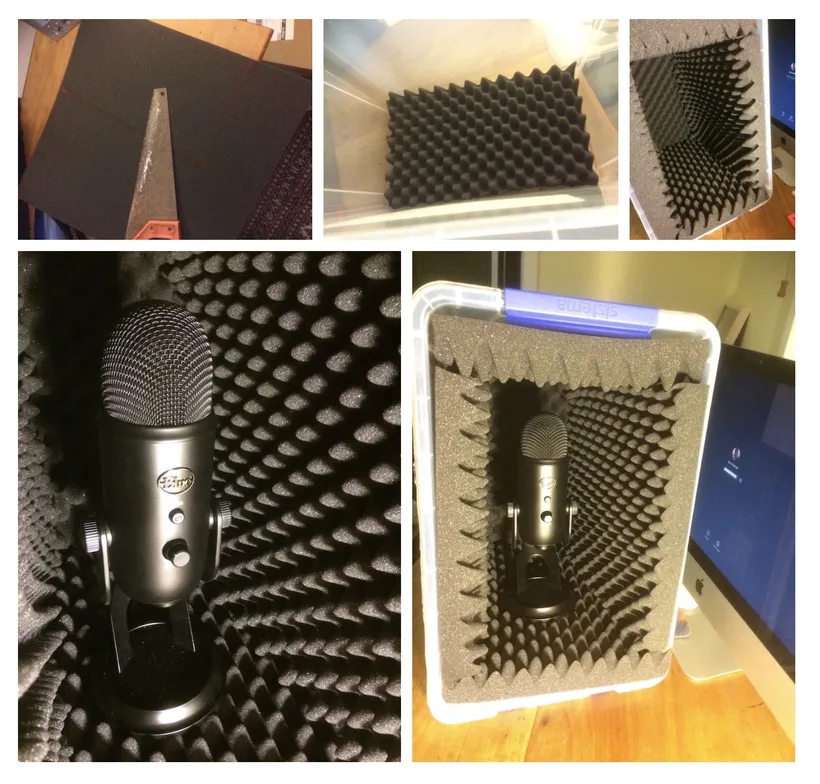
That intervention can be ugly!
The neat thing is, the wall behind your microphone is also very likely the wall behind your camera.
In other words, no one (except you, sorry) will be able to see that wall. You can get away with some aesthetically questionable DIY solutions there.
Speaking of questionable DIY solutions, check this setup I had when I got my start making screencasts on YouTube:
Good times.
Quick aside: This post is not about microphones, but the mic you see in the photos above is the Blue Yeti. It has a very good sound, but it’s also the MVP of catching all the room reverb it can. All of it, and then some. If you’re working in an untreated room with a noisy environment, this is not the mic you want.
Back to our “first impact” wall. Really, do what you gotta do here to improve the situation. Acoustic foam, blankets, heck a whole mattress!
If you’ve got your floor + the wall behind your microphone all fluffed up, you should be in a really good position already!
You know the drill, do the clap/snap test again.
For the rest, time to get creative!
At that point, you still have 3 hard flat walls, and the ceiling.
That’s still a lot of surface for your voice to bounce around and find its way into your mic.
Adding foam tiles on the walls will help, but I found that what works best, at this point, is to break the straight angles between the remaining exposed sides of your room.
Anything that is thick, soft and fluffy - and is placed between these walls - will help.
Some valid suggestions
- If you have the space (and budget) for it, a couch is a fantastic option. It will look great in your on-camera background. It will absorb a metric-tonne of bouncing soundwaves, and will also give you a spot to chill and think about your next screencast.
- A bookshelf full of books is also a fabulous choice for many of the same reasons (maybe not the chill spot one). That, and you’ll appear very cultivated. The shelf itself will likely by a hard surface, but it will still deflect the bouncing soundwaves. And all the paper in those books will devour room reverb for you.
- Fluffy teddy bears are excellent reverb absorbers, too. So if you’ve got kids, steal a handful of those and put them around the room. Your kids will love hearing that the teddies are watching you work.
- Clothes are also ultimate reverb eaters. You could have a little rack with some clothes hanging against a corner of the room, or even as cool background decoration.
- And of course, plants. Plants are amazing, as always.
You get the idea.
Cut lines of bouncing loops. Break angles. Put a lot of stuff near corners of the room (bass traps), as bass frequencies tend to converger there.
What’s left at this point?
That will still leave most of your walls wide open, but if you’ve got enough stuff around the room, you should be in a place where you’re now likely happy with your audio.
In a quest of trying to get really good audio in my office, I took a step many may likely not be willing to.
The next steps from this point forward might turn you off a little. It’s okay, you don’t have to go that far yourself.
Cover the rest of the walls, too
Yep. I have personally covered 3 of my 4 walls, with thick moving blankets.
Ugly blankets.
Moving blankets have very similar properties to fancy acoustic blankets. But instead of costing $100+ each, they cost like 5 bucks.
Or they can be collected for free, very easily.
The same as professional acoustic blankets?
Ok, they’re not exactly as good as professional acoustic blankets. But honestly they’ll get you a good 80% there.
And that’s what I consider a life hack, now that I discovered it.
A very nerdy kind of life hack, I guess.
LOL - what does your room look like?
The only wall that looks nice in my room is the wall you see in my YouTube background, with the IKEA cube shelf with some deco items.
Even there, I added some foam tiles, because I became obsessed with removing as much reverb as I could.
The rest of the room looks like the inside of a camping tent, basically.
That was the price to pay to reach the ultimate stage of DIY sound treatment for my room.
I don’t think I’d recommend this extra step to everyone. Only do that if audio quality is critical to you.
Show us how you did it, Simon
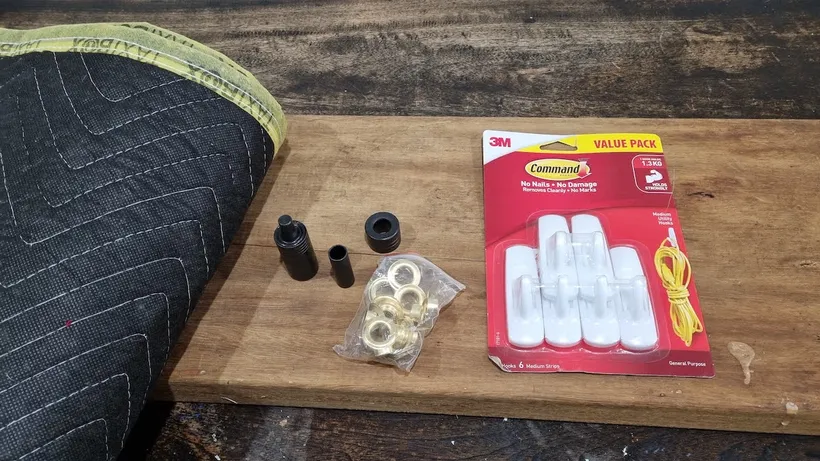
If you’re curious about how I hung heavy blankets on the wall, here’s what I did.
Mind you, we’re renting the house we live in. Which means we cannot put any nails in the walls, or do any permanent changes to the structure of the house.
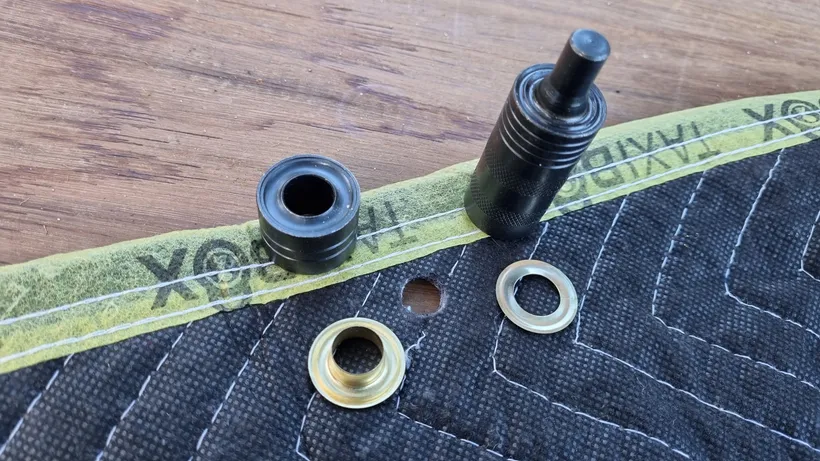
So, I got creative, and used 3M removable hooks to mount stuff on the walls.
I punched some fancy “ringlets” into my moving blankets, so that they could hang nicely on the hooks:
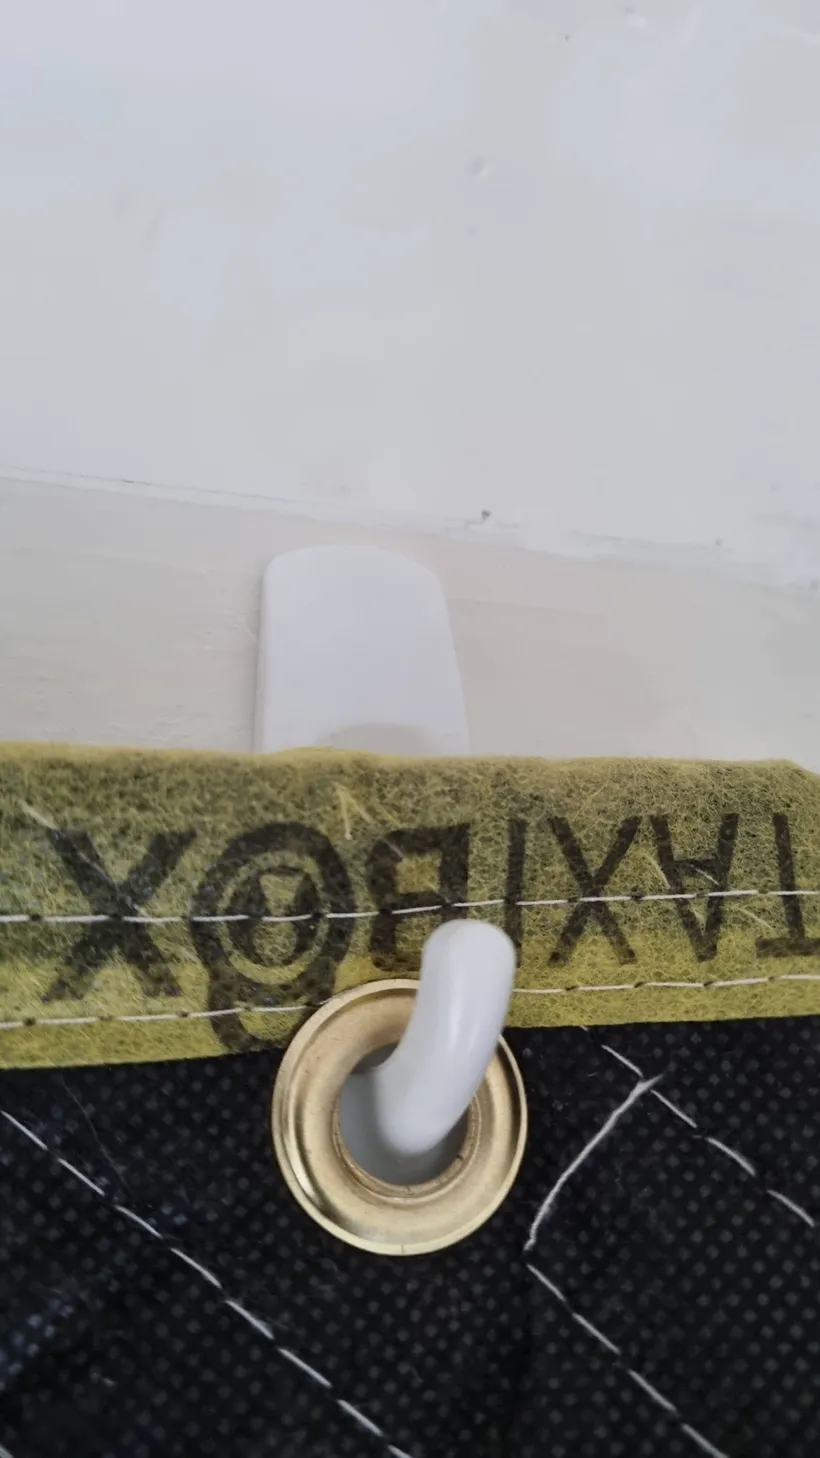
This particular install in this last picture was my first attempt.
I made a little mistake by having the blanket right against the wall. Setup that way, the sound could still bounce off the wall, behind the blanket.
And the angle of the sound wave bounce was not altered.
I realised that thanks to my scientific clap test. I found that that I could get much better results by having the blanket slightly off the wall, and at a different angle.
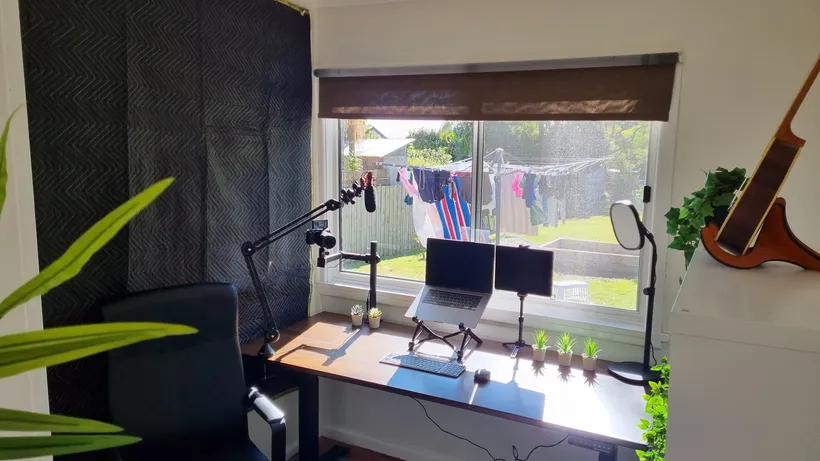
Here’s a timelapse video of another install. You can actually see that blanket in the background of the videos I made for Tailwind Labs!
Also notice how I used two different walls to create an angle and some separation from the wall behind.
That works great: the angle deflects the bouncing loops, and some of the sound waves get trapped between the wall and the blanket.
They probably have their own little bounce party internally, within that small space. And I am happy they’re having a good time in there, away from my microphone!
Nice! How does the room sound after all this work?
I think it’s time for the final clap test!
Here it is:
I honestly think that all the efforts I made were worth it.
I had the moving blankets already since I had just moved into this house. I spent a whopping $23 for the 3M hooks, ringlets and the “hole puncher” thingy.
I did spend a few hours setting all the blankets up, but… I maintain that it was all worth it.
Is reverb the only thing I should worry about in my room?
No, it’s not. But it’s by far the #1 thing you should worry about.
Once you’ve got the reverb reigned in, consider the following:
- Do you have air conditioning in the room? If so, you should consider turning that off during your recordings.
- Do you have a small fridge? You know, the one full of LaCroix or whatever dev juice you’re into? If so, you should consider putting it outside the room.
- Do you have a window and a door? I hope so! If so, close them during your recordings.
You should “dial” the room improvements to the level you’re comfortable with
As you’ve noticed towards the end of the post, thing got a little intense.
Add to this blackout blinds + bright lights for camera work, and you’ll find yourself in a hot, humid sauna when doing prolonged recordings.
That’s some degree of commitment not everyone is necessarily willing to get into, and you shouldn’t feel like you have to either.
Like I mentioned earlier in the post, you only need to be above a certain threshold of audio quality to make sure you don’t turn off a vast majority of your audience within the first 5 seconds of your screencast.
And honestly, the “basic” treatment (floor, first impact wall + a few fluffy objects) is likely good enough!
It depends™ on where you want your mic
The basic room treatment is probably good enough if you’re happy to have your microphone on-camera (but that’s a topic for another post!).
With those room improvements, just about any microphone you use, as long as it’s close enough to your mouth and the levels are set properly (hey, another other post!), will be just fine.
And by close enough, I mean within a shaka distance 🤙, where the thumb touches your mouth, and the pinkie touches the mic.
Why?
See, the further away the microphone source is from your mouth, the more you’ll notice room reverb.
So if you’re considering using an off-camera microphone (they’re typically called “shotgun” mics), you might need to consider stepping up your level or room treatment.
It’s really nice to not have a microphone + boom arm right in front of your face and arms when doing screencasts. And it looks very pro when you pull it off.
But if you want to pull it off nicely, you’ll need to consider every way to improve your room audio.
Even if it means recording a claustrophobic dark cube covered in blankets 🙀
That’s the name of the game, and the price to pay if you’re trying to achieve the best possible audio quality you can, without a budget to build a proper recording studio, or rent one.
And even then – leafblowers, motorbikes and barking dogs will become the bane of your existence.
Uuuuh, are you okay, Simon?
Whew. That post took a dark turn towards the end, eh?
But yes, I am ok. Thanks for asking! ❤️
Like I said, dial the room improvements to the levels that bring you “good enough” audio quality for your own needs. The level where you find the right “return on investment” for your improvement efforts.
I hope this post helps you in your screencasting journey!